 Creating stepped walls
|
Command |
Workspace: Path |
|
Create Stepped Wall |
Architect: AEC Landmark: Landmark > Architectural |
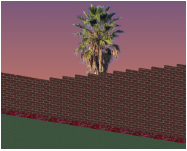
Stepped walls add wall peaks to existing walls created with the Wall tool or Round Wall tool. The existing wall can be a single wall or a chain of multiple wall segments that are L-joined to each other. Stepped walls can have a constant rise at each interval, or conform to underlying terrain with a variable rise, such as free-standing landscape walls or fences.

To create a stepped wall:
Select the wall or multiple, L-joined walls.
Select the command.
The Create Stepped Wall dialog box opens. Set the stair parameters.
The options available depend on the selected Step Style (even steps or terrain steps). If the parameters are set so that the steps are uneven, the top step is truncated.

Click to show/hide the parameters.Click to show/hide the parameters.
|
Parameter |
Description |
|
Even Steps |
Creates a stepped wall with a constant rise and wall peaks at even intervals |
|
Preview |
Previews the selected configuration |
|
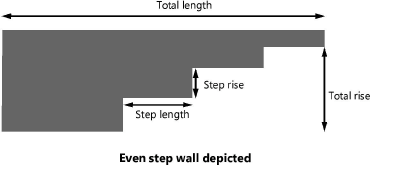
Total Length |
Displays the total length of the stepped wall to be created |
|
Number of Steps |
Displays the total number of steps to be created |
|
Calculator |
The steps are created based on three parameters: step length, step rise, and total rise. Based on the entry of two of these parameters, the third is automatically calculated. Click to place the calculator at the parameter that should be automatically calculated, and enter the values for the other two parameters. |
|
Step Length |
Sets the length of one step |
|
Step Rise |
Sets the rise of one step |
|
Total Rise |
Specifies the total rise value |
|
Apply Steps to |
Steps can be applied to either the top or bottom of the wall, or both |
|
Top of Wall |
Steps apply to the top of the wall |
|
Horizontal Offset |
Specifies the horizontal offset of the top steps; positive values move the steps to the left, while negative values move them to the right. This allows the last step to be shorter or longer, for example. |
|
Bottom of Wall |
Steps apply to the bottom of the wall |
|
Horizontal Offset |
Specifies the horizontal offset of the bottom steps; positive values move the steps to the left, while negative values move them to the right |
|
Reverse Direction |
Sets whether steps should be started from the beginning of the wall (option is deselected) or end of the wall (option is selected) |
|
Terrain Steps |
|
|
Total Length |
Displays the total length of the stepped wall to be created |
|
Number of Steps |
Displays the total number of steps to be created |
|
Step Length |
Sets the length of one step |
|
Vertical Offset |
Specifies the offset distance from the terrain surface; an offset of zero keeps the steps at the surface, while a positive value raises them above the surface |
|
Apply Steps to |
|
|
Top of Wall |
Applies steps to the top of the wall, mirroring the terrain |
|
Horizontal Offset |
Specifies the horizontal offset of the top steps; positive values move the steps to the left, while negative values move them to the right. This allows the last step to be shorter or longer, for example. |
|
Bottom of Wall |
Terrain steps are always applied to the bottom of the wall, since the steps follow the terrain |
|
Horizontal Offset |
Specifies the horizontal offset of the bottom steps; positive values move the steps to the left, while negative values move them to the right. |
|
Place Steps Above Terrain |
The steps are reversed so that they are above the terrain |
The Send to Surface command can be used on walls; it sets the bottom Z value at the start of the wall to the existing terrain surface (see Sending objects to the site model surface).
